Prototype Bus Stop Checker
Table of Contents
Overview
There are four bus stops around my apartment that my roommates and I use regularly. As we get ready to leave our apartment we usually check to see if we need to run to the buses or we can take it easy getting there. Using our phones takes a minute since we need to navigate them and wait for a response, so I wanted to see if I could make a system that would sit by the door and quickly serve up bus predictions.
I also happened to have a WiFi development board that I really wanted to put to use and justify buying.
In the end this was meant to be a proof of concept that I would later develop further with my TTC Check project which improved on this in several subtle ways.
Requirements
- Get bus relevant bus predictions upon request
- Display the next few predictions
- Use my ESP32 development board
Objectives
- Be faster to inform us of buses than our phones
Takeaways
It was really cool to see how fast not only I began to use it and enjoy the ease it brought, but also see my roommates do the same. Unfortunately it didn’t see much use once completed since we were leaving the house significantly less often once COVID hit.
After posting it on social media I had several friends ask for their own, so it made me wonder how I could go about adapting it into a more commercial project. So I decided to try it with a revised design.
Detailed Report
Around my apartment there are several bus stops my roommates and I use, and I wanted to see if there was some way I could set up a system to easily check for buses before heading out like we can when using our phones.
My first step was to see how services got their information from the TTC (Toronto Transit Company), which after some basic searching turned out to be through a partner site called NextBus (they have since been re-branded as UMO). This partner ran a service that would provide information in XML format to simple command.
The commands and interactions are described in the following PDF, which shows that the commands could be for other info than just the predictions for a given route or stop. A very helpful command for me was the "routeConfig" command because it lists out all the stops along a given route with their information. I used it to determine the numbers I needed to use to properly refer to a given stop, because I found out that the numbers you use to text for predictions at a stop do not match the number NextBus uses to identify stops in requests. Below is an example of one of the stops along the 52 and the information provided.
<stop tag="15003" title="Lawrence Station" lat="43.7252499" lon="-79.40225" stopId="15184"/>
If I were to check the buses to arrive at Lawrence Station using the TTC’s SMS service, I would text the "stopId" value, 15184, printed on the sign there. However when performing a request on NextBus, I need to use the "tag" number, 15003. Once I went through and recorded all the tags I needed I had all the information needed to make requests for buses and successfully tried it out on my browser. It would return the bus predictions in this format:
<predictions agencyTitle="Toronto Transit Commission" routeTitle="52-Lawrence West" routeTag="52" stopTitle="Lawrence Station" stopTag="15003" />
<direction title="West - West - 52f Lawrence West towards Royal York" />
<prediction epochTime="1641840499907" seconds="31" minutes="0" isDeparture="false" branch="52F" dirTag="52_1_52F" vehicle="8943" block="52_16_160" tripTag="43470454" />

...(other predictions)...
Starting on the Microcontroller
The next step for me was to decide what microcontroller to use for this and how to parse the returned XML file with it. The choice was easy since I only had one microcontroller with WiFi built in, the ESP32. To parse the XML I looked for some libraries online, and found one called “tinyXML” that was meant to work with any microcontroller programmed using the Arduino IDE.
I looked to the example to see how to get started with it, and found they had only one example… NextBus! Needless to say, this made things much easier for me since I had a solid foundation to collect the data I needed. I adapted the code, changing the request parameters for what I needed at each stop and then tested the system to verify it worked for me with reliable data comparing its output (over serial) to my own from my browser.
Interface
With data collection working, all I had to do was tie it all together with some way for users to ask for a stop and to display it to them. I decided to use four buttons to correspond to each stop we wanted, and a large four digit, seven-segment display for the times.
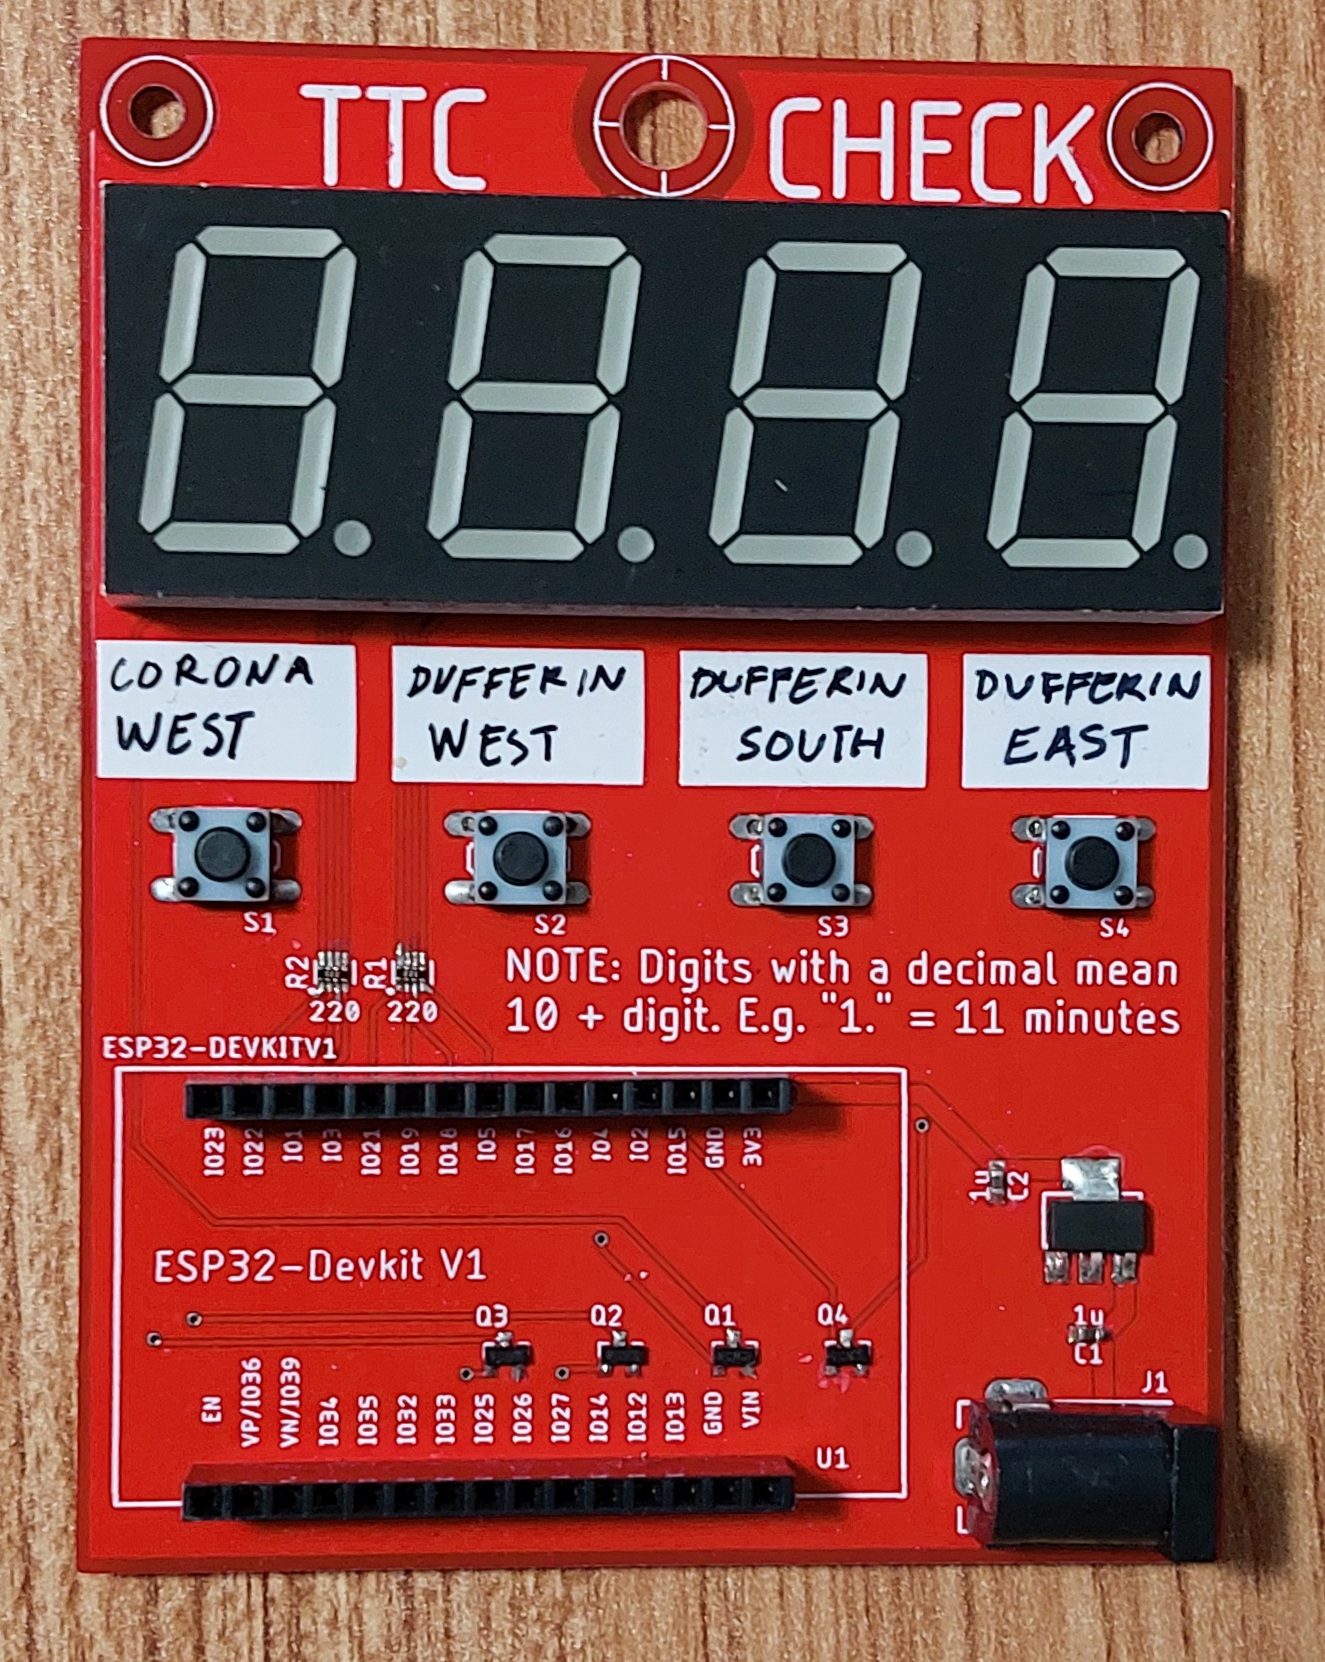
To display a series of bus predictions on the one display, I decided to use each digit as a separate space to show a prediction. To show predictions past 9 minutes on a single digit I decided to show the trailing digit and illuminate the decimal point that follows it (e.g. “1.” is 11 minutes). This limits the predictions displayed to 19 minutes, which I think is reasonable since I am fairly certain no one would bother waiting that long for a bus.

To help with people knowing which button to press, I made filled areas of silkscreen on the circuit board to allow us to label each button as needed, rather than a brutish “BTN1” through “BTN4”. I powered it with a basic 5V USB power supply and it rests comfortably by our door.